
You can load 4" x 6" (10 x 15 cm) or 5" x 7" (13 x 18 cm) size photo paper in the cassette (upper).
Load large sizes of paper in the cassette (lower).
 Important Important
|
 Note Note
For details on the Canon genuine paper, see Media Types You Can Use. |
Prepare paper.
Align the edges of paper. If paper is curled, flatten it.

|
Note
For details on how to flatten curled paper, see "Load the paper after correcting its curl." in Paper Is Smudged/Printed Surface Is Scratched.
|
Load paper.
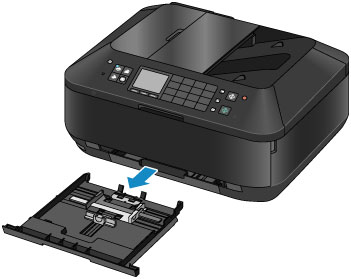
(1) Pull out the cassette (upper) from the machine.
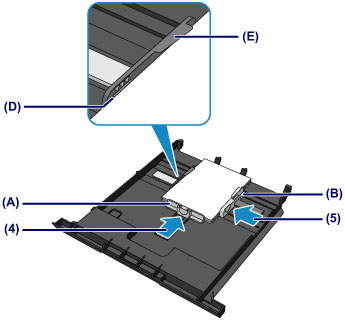
(2) Slide the paper guide (A) in front and (B) on the right to open the guides.
(3) Load the paper stack WITH THE PRINT SIDE FACING DOWN, and place it in the center of the cassette (upper).
|
Note
If the paper stack is in contact with the protrusions (C), the paper may not be fed properly.
|

(4) Align the paper guide (A) in front with the paper stack.
For standard sizes, align the paper guide (A) with where it clicks into place.
(5) Slide the paper guide (B) on the right to align the right and left guides with both sides of the paper stack.
Do not slide the paper guides too hard against the paper. The paper may not be fed properly.
|
Note
|
(6) Insert the cassette (upper) into the machine.
Push the cassette (upper) all the way into the machine.

Open the paper output tray.
(1) Holding both sides of the paper output tray, gently open it.
The output tray extension opens automatically when the paper output tray is opened.

|
Note After loading paper
|
Page top |


